Proposals
Getting Started
Tip
Building a proposal is very similar to building an itinerary in a Trip. If you are not familiar with itineraries, take a moment to review that section of the documentation here: https://docs.trytess.com/trips/itineraries/
Information
Proposals are a feature of the Advanced Package in TESS. To check your subscription level, click on your name in the upper right corner, then click the My Account tab. If you are on the Standard Package there will be a red “Upgrade”button in the Advanced column. Just click the button to upgrade.
There are a few places you can start a proposal; we will start from our Trips list
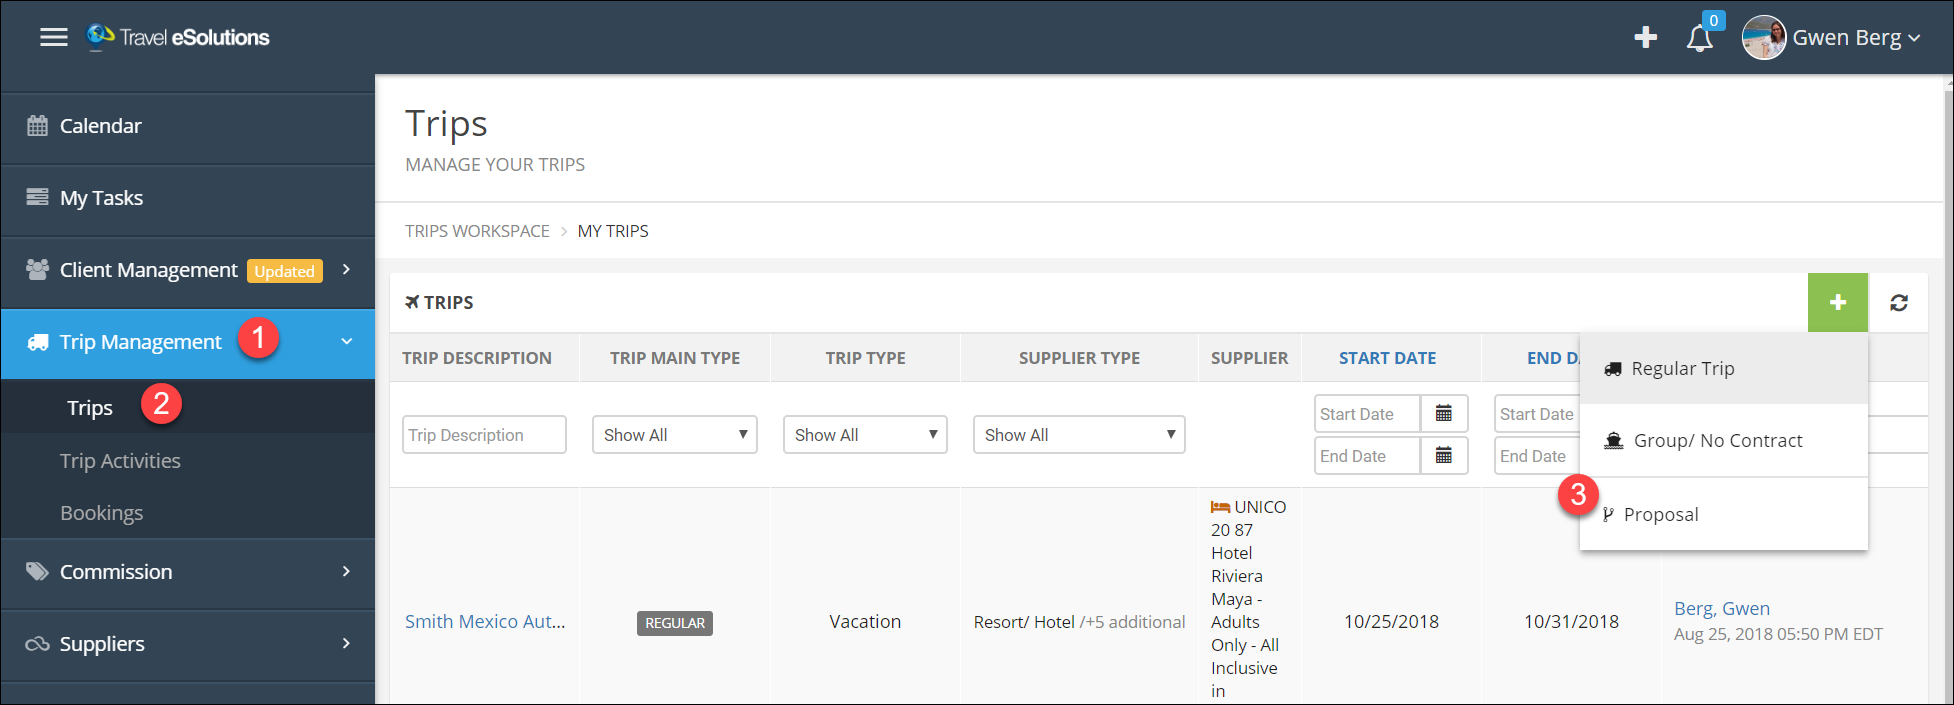
- Click Trip Management in the main menu.
- Click Trips.
- Click the green and white plus (+) icon in the top right corner and select Proposals.
You will see the proposal screen, which will look a lot like the Trip screen.
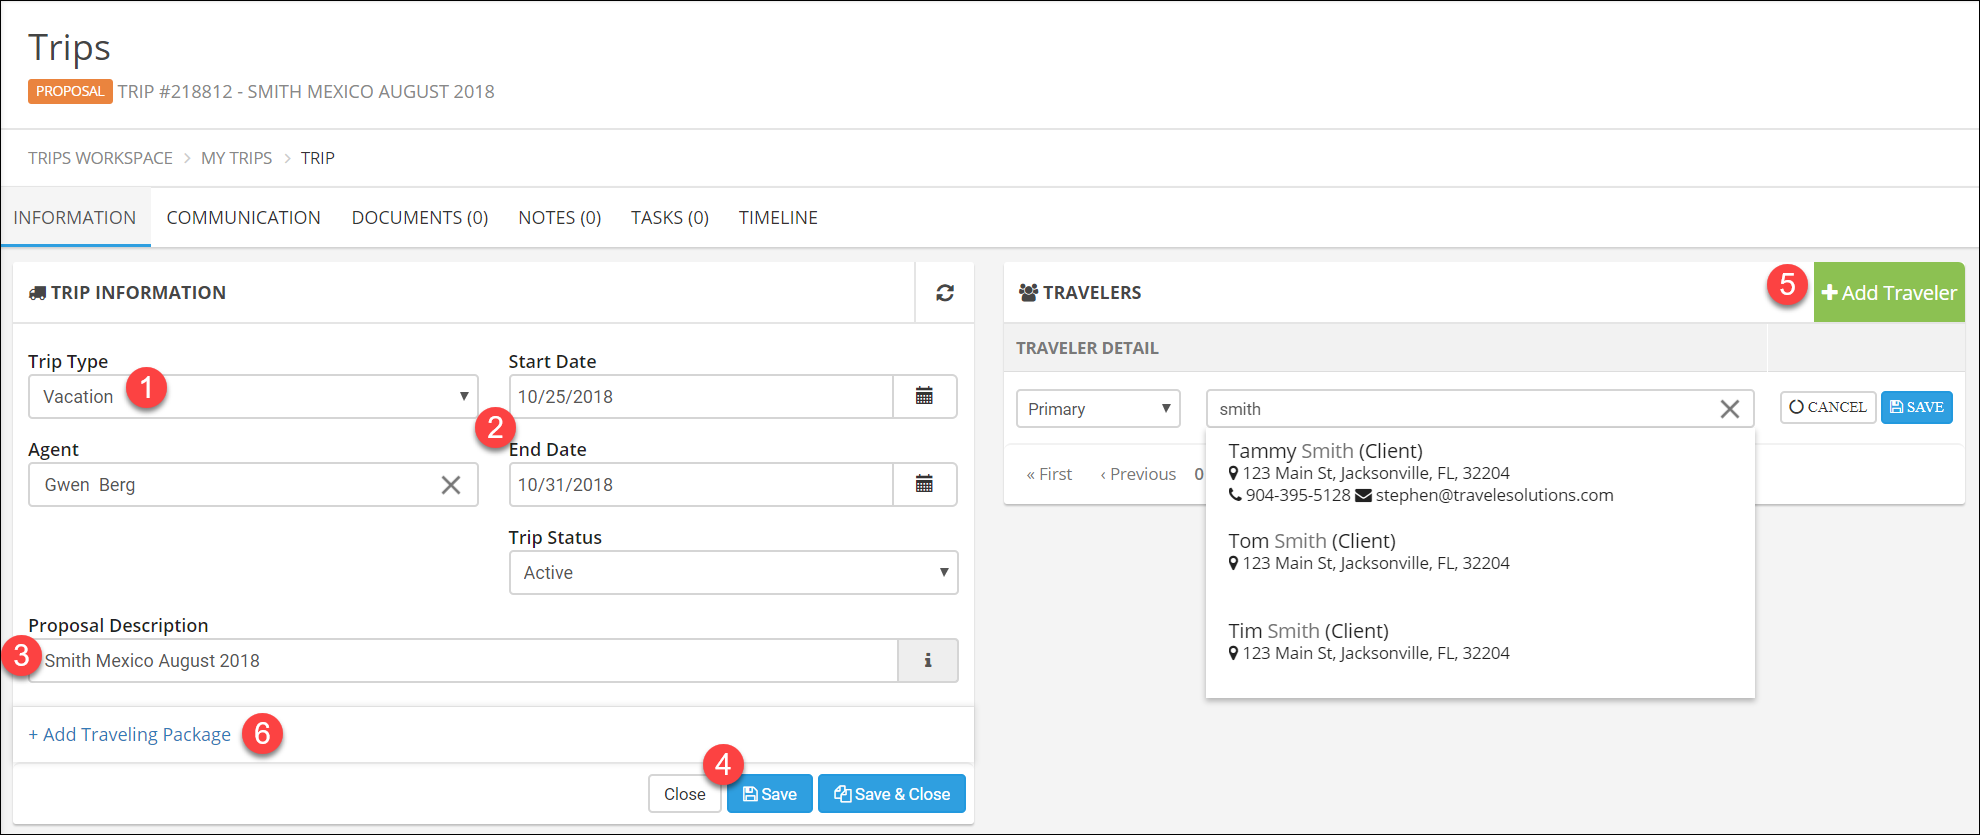
Enter the basic proposal information
- Choose the Trip Type, if none apply just use Vacation.
- Enter the Start and End Dates.
- Enter a Proposal Description - your clients will not see this, so make it something meaningful to you, such as the client name and destination. For example: Smith Mexico Fall 2018
- Click Save.
- Click Add Traveler and add a client just like you would for a trip. This can also be left to be completed later.
Create a Traveling Package
You are creating a proposal document for your client, and you often will want to give your client different options. There are two ways to do this; the first is with a traveling package. You can have as many packages in a proposal as you need, but for most clients you will want to limit it to two or three.
The second way to give a client options is by providing multiple room options within a package. In our example, we will offer our client two package options for resorts in Riviera Maya with two room options for each resort.
In this example, we will add resorts, flights, and some activities, but you your proposal may be much simpler or much more complicated than this, depending on your client's trip. The process works the same way for cruises and tours.
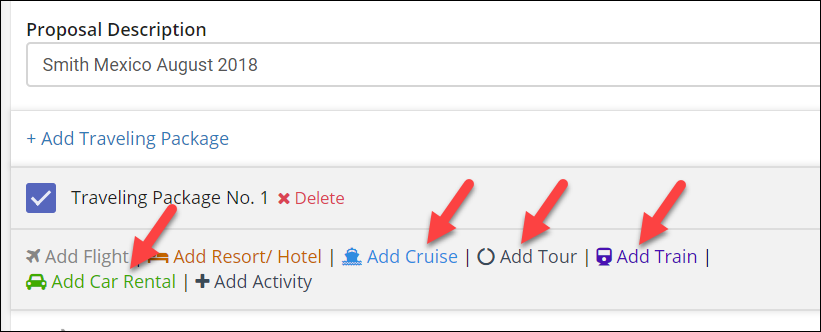
To start, click Add Traveling Package (step 6 above).
Add Flights
Steps
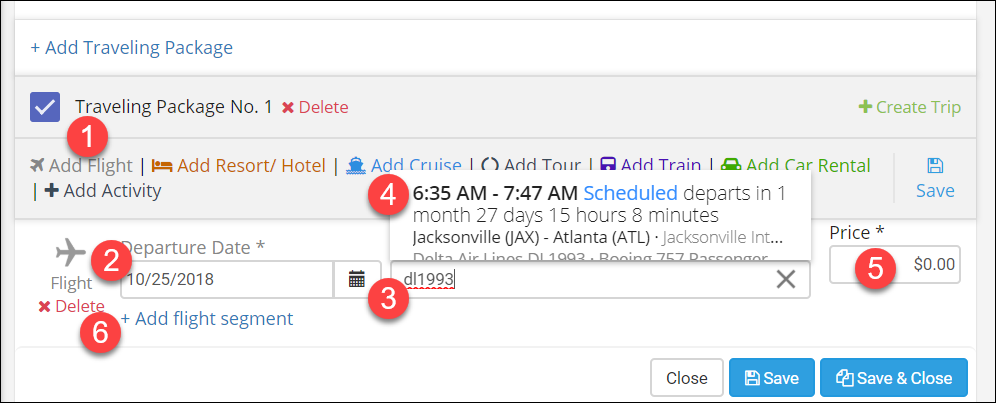
- Click Add Flight.
- Make sure the date is correct.
- Enter the airline code followed by the flight number without any spaces. TESS uses the standard airline codes, which you can find under the Suppliers menu. Some common ones include: UA for United Airlines, DL for Delta, AA for American, B6 for JetBlue, WN for Southwest.
- When the flight is found, click on it so the full trip description is shown.
- Enter the price of the flight, or enter zero if the price is included in the package price.
- Click Add Flight Segment and continue adding any additional flights.
Add a Resort/Hotel
Steps
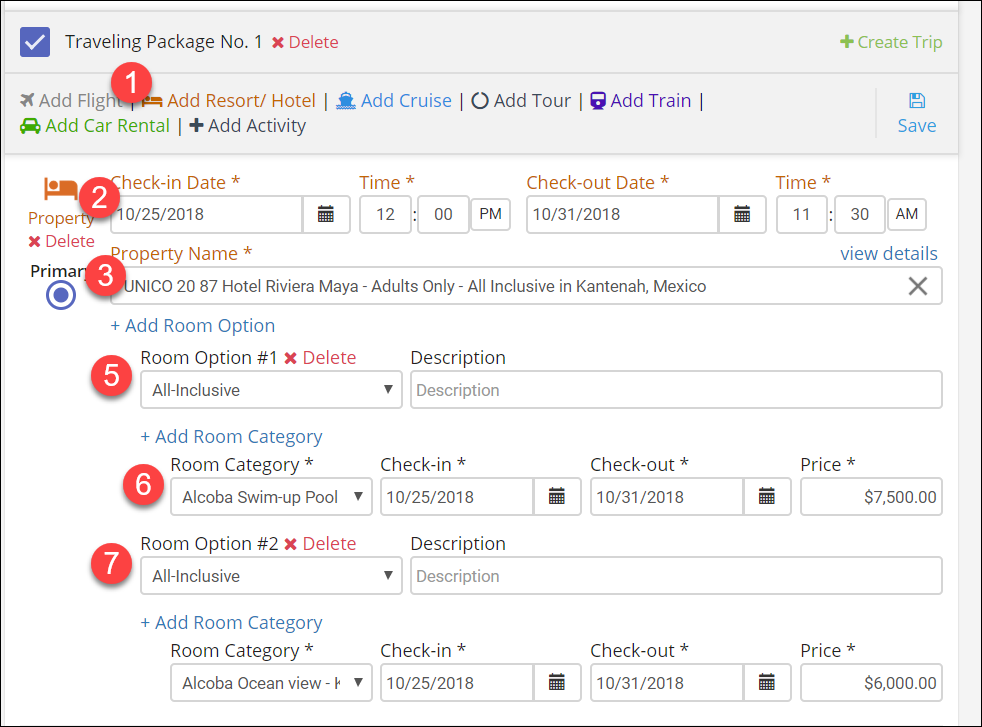
- Click Add Resort/Hotel.
- Update Check-in/out dates and times. Make sure your check-in time is after your flight arrival time so the proposal will be sorted correctly.
- Enter the property name in the search box.
- Select the property from the list. With over 450,000 properties in TESS common hotel names can be harder to find.
If you are having trouble try making sure you are searching for the official property name and contact support if you cannot find it. - For the room option, choose the appropriate type, usually All-Inclusive or General. You can enter a description here as well.
- Choose the Room category, update the dates if needed, then add the price.
- In this example we want to give them the choice between two rooms, so we will click "Add Room Option" again and repeat steps 5 and 6.
- If you want to quote two or more rooms - not two options but a quote for double rooms - click the Add Room Category again to add a second room to the same room option.
Add Tours, Cruises, Trains, Cars
These items will work just like the hotel. You can use them in combination with a hotel or on their own.
Add Activities
TESS allows you to build and share a library of other activities within your agency that can be re-used, or to add one-time activities to your itinerary.
Available activities include:
- Dining
- Excursion
- FastPass
- General Information (for anything that does not fit in one of these categories)
- Tickets
- Transfer
Tip
To add a re-usable activity, go to the Main Menu on the left, click Trip Management, then Trip Activities.
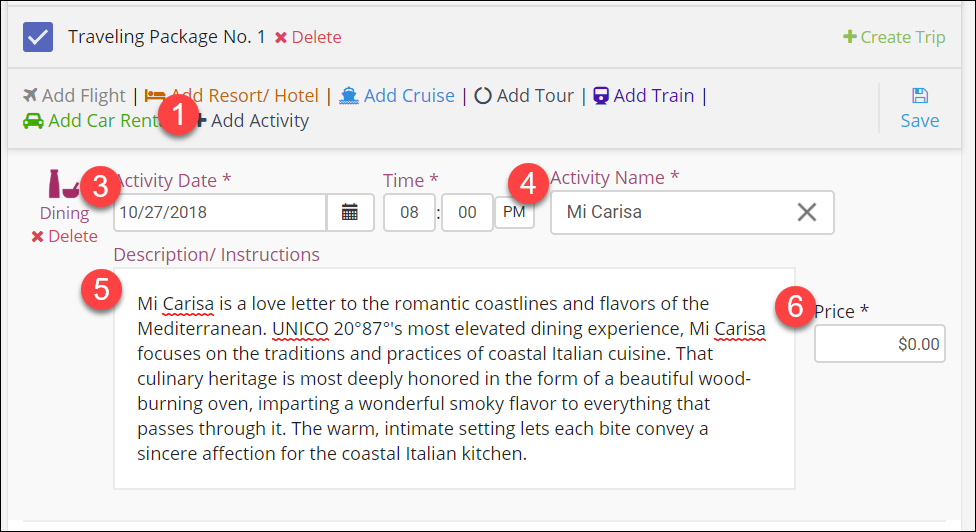
Add an activity to your proposal
- Click Add Activity.
- Choose an activity type.
The remaining fields will vary some by type. - Update date and time.
- Search for the Activity Name, if it is a saved activity type it will populate the name and description. If it is not a saved activity, you can enter it manually here.
- Update the Description/Instructions if needed.
- Enter the price, or enter zero to have it show as included in the package.
Repeat for additional activities.
Add a Second Traveling Package
Click Add Traveling Package again and repeat the above steps to create the second package.
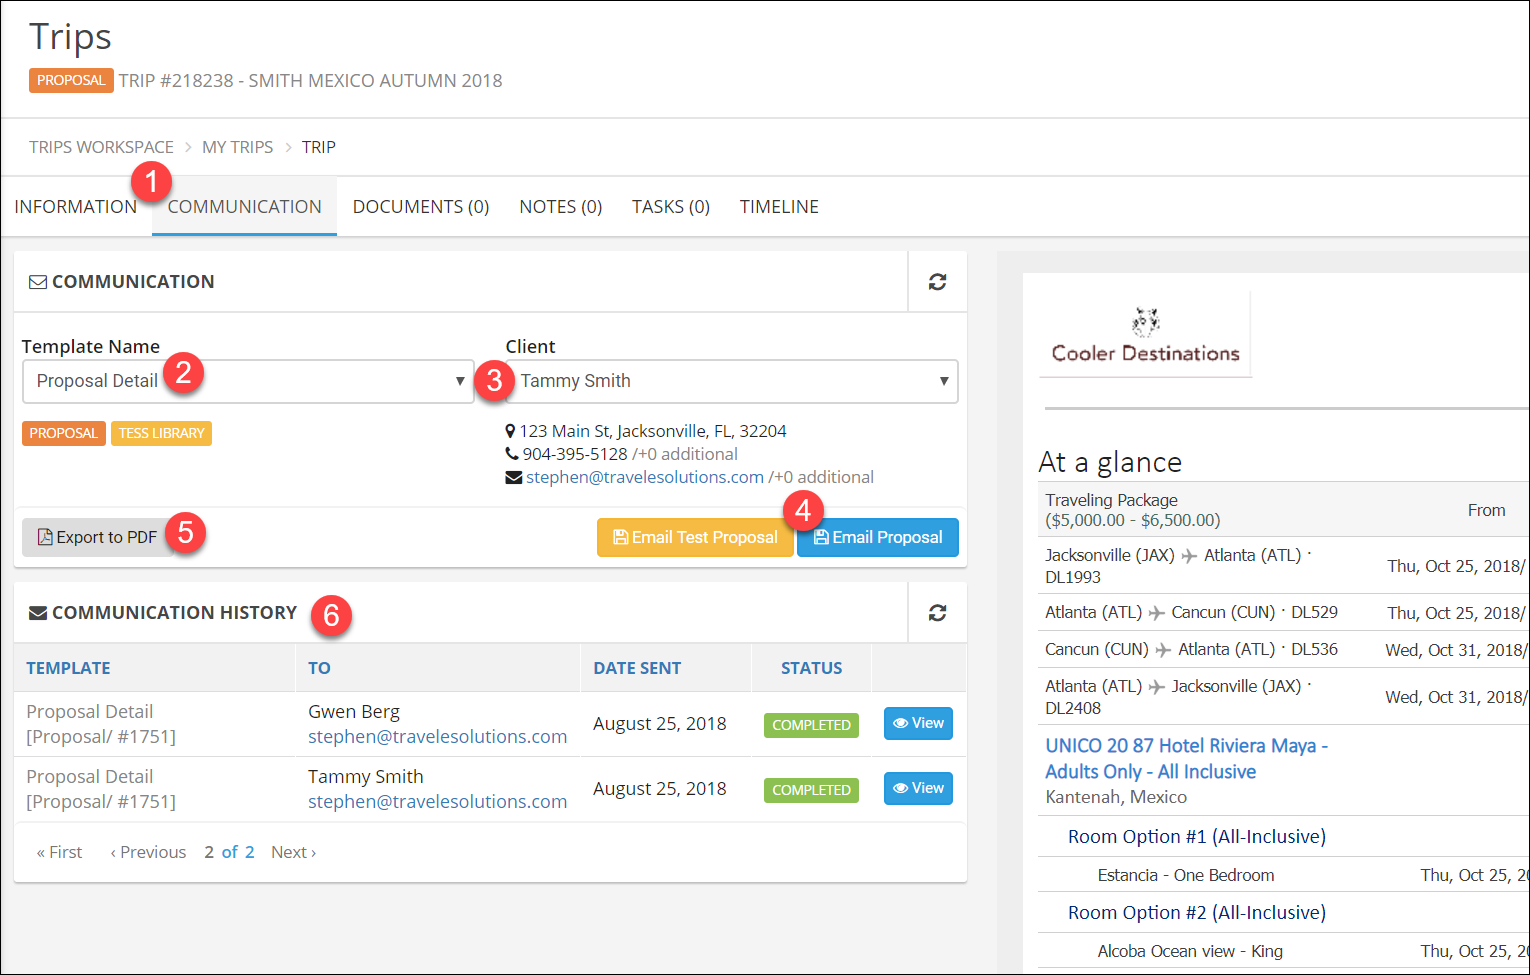
Create Proposal Email or PDF
Steps
- Click the Communication Tab.
- Choose the Proposal Detail template type. You can also create your own templates under the Templates main menu.
- Choose the client who will receive the proposal.
- Click "Email Proposal"
- You can also export the proposal as a PDF by clicking the "Export to PDF" button.
- View previously sent proposals in the Communication History section.
Tip
If anything is not in the correct order on your proposal, double check your dates and times on the Trip Information page.
Continue Working with Your Proposal
As your client provides feedback on your proposal, you can:
- Modify current packages.
- Add additional packages.
- Deactivate packages they have rejected.
- Re-order packages so they are in the order you want your client to see them.
Tip
When you make changes, go back to the communication tab to send an update.
Proposals in the Client Portal
Your clients can also view your proposal in their client portal. To send a portal activation, see the documentation here: https://docs.trytess.com/clients/client-portal/
Convert the Proposal to a Trip
Once your client has made their decisions, you can easily convert the proposal into a trip, creating the itinerary automatically.
Steps
- Click the "Create Trip" link for the appropriate Traveling Package.
- Select the Room Option they chose (if applicable).
- If you are adding this to an existing group trip, search for the group trip name. If you skip this step it will be converted as a standard trip, but you can convert the standard trip into a group later if needed.
- Click Create.

Success
Your proposal is now a trip! The itinerary is built automatically, but you will need to go to the Bookings tab to add bookings once you have created those with the supplier(s).